Registering a payment correctly matters for good business administration. When a customer pays an invoice, or you pay a supplier’s purchase, record it against that document: Invoice Office then updates the payment status and books the payment in your journal. Invoices and purchases work the same way, and a payment you registered can be modified or deleted later.
Register a payment on an invoice
- Go to Sales → Invoices and find the finalized invoice that has been paid. (The plus next to Payments in the Sales menu, and the Register payment button on the Payments list, open the same list of finalized invoices — a payment is always registered against a document.)
- Open the invoice’s Action menu — the ⋮ button in the Action column — and choose Register payment. The same menu also has View payments, for what is already registered against that invoice. On an open, finalized invoice you find both options in the Action menu at the top.
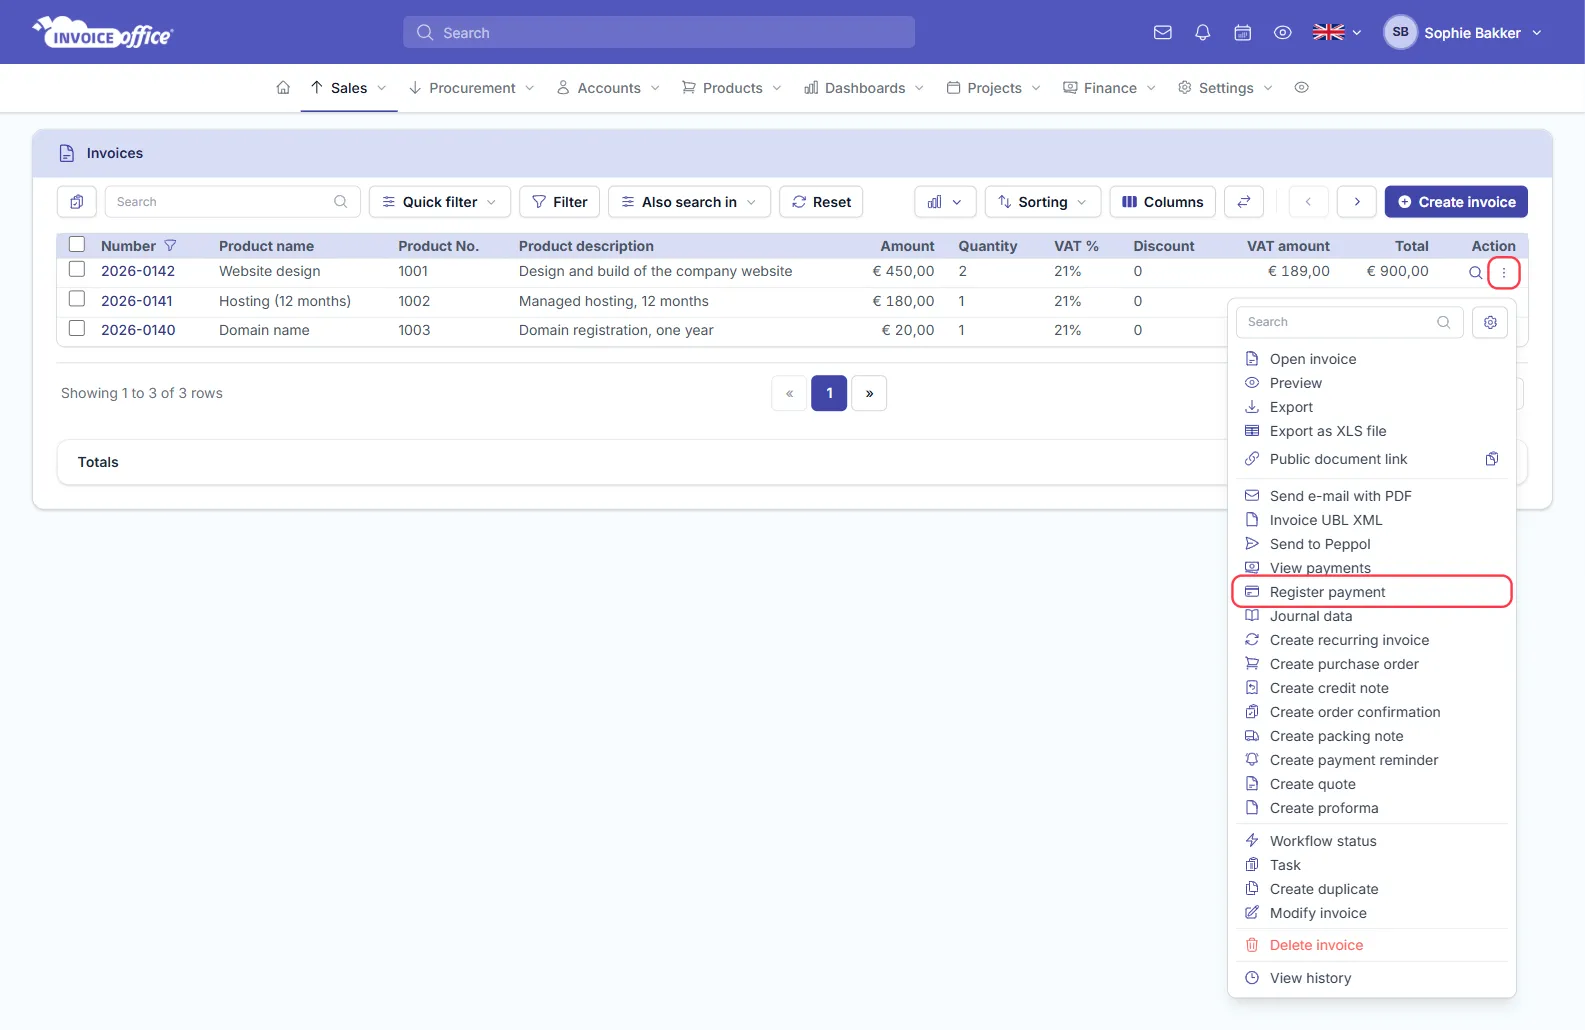
- Check the payment details — see What to fill in below — and click Register. If you opened the form from the Action menu at the top of the invoice, the button says Save.
Register a payment on a purchase
- Go to Procurement → Purchases and find the finalized purchase you have paid. (The plus next to Payments in the Procurement menu opens the same list.)
- Open the purchase’s ⋮ Action menu and choose Register payment. On an open, finalized purchase, Register payment and View payments are in the Action menu at the top.
- Check the payment details and click Register — or Save, if you opened the form from the Action menu at the top.
Did you fill in Paid on before you finalized the purchase? Then the payment was registered automatically when you clicked Finalize. Check View payments first, so you do not record the same payment twice.
What to fill in
The payment form has two tabs.
Payment
- Amount payment — filled in with the amount still unpaid. Double check it matches what was actually paid.
- Payment date — today by default. Set it to the day the money actually moved.
- Payment method — your default payment method is preselected.
- Bank account — the company bank account the payment went through. Your default account is preselected.
On the right you see Invoice amount, Amount paid, Amount unpaid and the Document number. They are for reference and cannot be changed.
Additional
- Attachment — Upload a receipt or remittance advice to keep with the payment.
- Write off difference — when the amount paid differs from the total, for example because of bank charges or payment-provider costs, choose a cost account here. The difference is booked to that account and the document is settled as fully paid. Leave it on None to keep the difference open.
- Description — a note on the payment, if you want one.
- Send notification — invoices only. Switch it on to email the customer that their payment was received in good order, and pick the Email Template to use.
Part payments and the payment status
Register what actually came in. Invoice Office compares everything registered against the total and sets the status of the invoice or purchase for you:
- Paid — the total is covered, or the difference was written off.
- Partial Payment — less than the total has been paid. The next time you choose Register payment, the remaining amount is filled in, so you do not have to track the balance yourself.
- Overpaid — more than the total has been paid.
See all your payments
Click Sales → Payments for the payments on your invoices, or Procurement → Payments for the payments on your purchases. View payments on a single invoice or purchase shows just the payments for that document. From the list you can search, filter by payment method and date, choose your columns and export to PDF, Excel or CSV.
Modify a payment
Entered the wrong amount, date or payment method? Correct the payment itself — there is no need to delete it and start again.
- Go to Sales → Payments or Procurement → Payments, or choose View payments on the invoice or purchase.
- Open the ⋮ Action menu in the row of the payment and choose Modify payment.
- The payment form opens with the details you registered. Change the Amount payment, Payment date, Payment method or Bank account, or update the attachment or description.
- Click Register to save the change.
Invoice Office recalculates the payment status of the document and rewrites the journal entries for that payment, so your accounting follows the correction.
Two things cannot be changed afterwards: the document the payment belongs to, and the Write off difference and Send notification options, which are only offered when you first register a payment. Registered a payment against the wrong invoice or purchase? Delete it and register it again on the right one.
Delete a payment
- A purchase payment — open the ⋮ Action menu in the payment’s row and choose Delete.
- An invoice payment — tick the checkbox in front of the payment on the Payments list, then click Remove in the bar that appears above the list. This also works for several payments at once, on both lists.
Confirm, and the payment is gone. The payment status of the invoice or purchase is recalculated, and if the payment was linked to a bank statement line, that link is removed as well.
Getting the date and amount right
The date and the amount are what your accounting is built from, so it is worth checking them on the payment form rather than correcting them later. If one does slip through, modify the payment as described above.